First Alice In Wonderland Party Part 2
I’m trying to be better about posting on my blog more often. Being a creative means you may not necessarily be very regimented, unfortunately. I noticed that a year or so ago, I posted my first Alice in Wonderland Party Part 1 post with no follow up. So here it is… PART 2!
If you can not remember my older post or have not seen it, you can find it here: http://consumedbycreativity.blogspot.com/search?updated-min=2014-01-01T00:00:00-08:00&updated-max=2015-01-01T00:00:00-08:00&max-results=2
My prior post tells you about the order of events with my actor friends who played all the parts of the Wonderland characters. At the time, we were living in Savannah and the party was in the dead of summer so that means hot and humid in the south. If the weather was better, we would have sat outside, but we decided to eat inside in the air conditioning.
Invitations:
Our invitations were two fold. First, I sent out a save the date card a month in advance. When you are having a party that big and putting that much money and time into it, you want to make sure people will have the head’s up to come. I found clipart of a teapot online, printed it out, and cut it out. I had a lot of pretty scrapbook paper, so I traced the teapots, and cut them out of those pretty papers. I made sure I cut them out in matching pairs. Make sure when you cut them out, the wrong sides of the paper are facing each other. Then I hot glued around the sides and bottom of the tea pot with an opening at the top so it became like an envelope. Inside each teapot I put a tea bag and a save the date card magnet. I designed the save the date card on my computer, punched a hole in it and tied a ribbon to it. Each card was backed with an adhesive magnet sheet. My hope was that our guests would put it on their refrigerator to remind them.


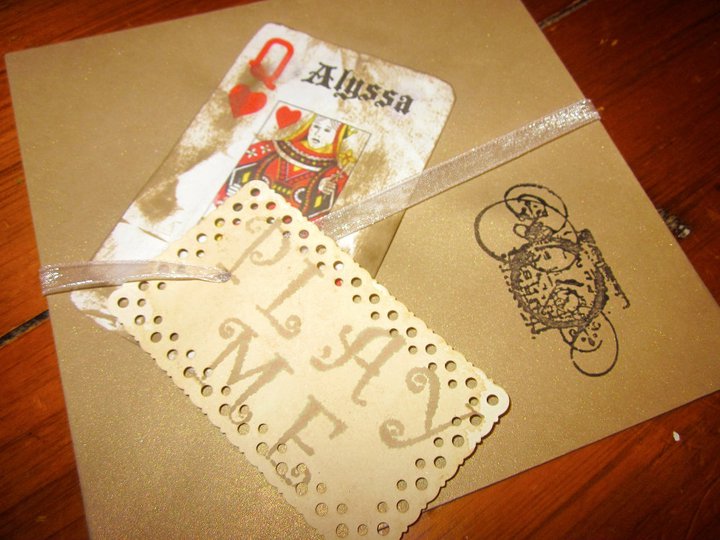
Many years of being a preschool teacher and an actress has made me quite good at crazy voices. I thought…wouldn’t it be great to send a CD that had Alice inviting the children to the party. So I used the Alice in Wonderland, "A Merry Merry Unbirthday" as a background to my CD invite. I used garage band to loop the instrumental part while “Alice” invited them to this whimsical tea party complete with sayings she says in the book, like “curiouser and curiouser!” (When my Etsy shop is not on vacation, I make custom Alice CD invites for others). At the end of Alice’s speech, I had the complete song play. For the envelopes I printed out queen of Hearts cards(found on the internet) with the invitee's name on it. I aged them a bit by rubbing a bronze stamp pad on them. I attached a tag that said "play me" and a stamp of a clock. The CD invites looked like this:

Decorations:
I used foam core board and cut it out large arrows. I painted them and used a black, permanent marker to write words on them that I saw in the movie in the Tugley Woods scene. I attached them all over the front of my house around my front door.

I found these flowers at Michaels and added google eyes on them. I put them in a decoration I already had of high grass. I used them on some of the tables for center pieces. Remember the singing flowers in Wonderland?


Michaels also had these teacup planters. I took some small ones that were already attached to saucers and glued them together at different angles with E6000 (if you didn’t know, is an amazing and strong permanent adhesive). I did the same with the large teacups and toped them with a large teapot I also found at Michaels. I also used these for centerpieces.


I wanted to play croquet with the kids and the Wonderland characters. However, I wanted it to be whimsical. Me and a friend of mine drew these large croquet characters on foam core boards. Then I painted them an cut them out. I attached stakes to the back of the characters with duck tape. That was the only thing that held when we went to hammer them into the ground. We had to hammer the stakes in the ground first, and then tape the characters to them. After trial and error we figured this out. HINT: don't kill your hands with scissors trying to cut these out! Use a Dremel. I only made these in foam core board for this party…after that I made them out of wood. The paint looks much better on wood I think and they last longer. When my Etsy shop, lil lollipops is off vacation, I sell these in my shop.


I used many different types of tables, including little kiddie tables and chairs. I had different colorful table cloths and runners on each. Each table had a different feel to them with different whimsical decorations on them, but all of them went together. I found a large clock on Amazon that is a costume clock and hung it from my lights. I also hung Chinese lanterns in different colors and tissue flower balls that I made. You can find a tutorial similar to the one I used here: https://youtu.be/nDiGHGzGXK0 I think looking back, I would have made them a lot larger or more of them. Make sure you make these way in advance because they can take some time depending on how many you want. I hung them with clear fishing string. I also found some mugs that kids could decorate themselves, so right when they got to the party they could sit down and start working on decorating their mugs and then use them for tea. All my usual furniture (couches, etc.) were pushed into another room with the door shut to make room for all the tables.


While the kids arrived and got settled, my husband ran around “painting the roses red." He was very frantically yelling before the Red Queen came out of the back room and crashed the party (more of that in my prior post about the party).

Here is the front of our house.

I used a tunnel and a fairy house tree stump tent that we had to simulate going down the rabbit hole. Inside the tree tent was a little table with little keys on ribbons. Each child "went down the rabbit hole" and got a key. They then proceeded to use their key to go in the small door (the little cottage) I had set up in front of our front door. The Mad Hatter would open the door and greet them.


Food:
Unfortunately, that day I had a high fever…but the show must go on! However, I was not thinking and did not get a picture of the food setup. I did get a picture of the adorable cookies I ordered from our local cookie bakery. Now, I know how to frost these myself(as you will see in future posts), but at the time, I didn’t. I asked them to make teapots, teacups and "eat me"cookies. In addition to the cookies, we had herbal tea, with different flavors for the kiddies to choose from, finger tea sandwiches, finger desserts, chocolate covered strawberries, and punch.


Do You Play Croquet ?
The Red Queen and the Mad Hatter led us out to play croquet. In addition to the character croquet set I made, I cut out flamingos from colorful poster board. I hot glued them to croquet sticks. I found many of these on Ebay or even on Etsy for pretty good prices since they were old, used and without a full croquet set. We also used a stuffed animal hedgehog to hit.


The party was so much fun! It was a hit! Many people said they would have paid to go to the party because my friends and actor friends made it so entertaining. Stay tuned for another posting in the future of another Wonderland Party I had when we moved to Massachusetts.
You can find more great ideas for Mad Tea Parties on my pinterest board "Wonderland"https://www.pinterest.com/nicoletteblount/wonderland/
You can find more great ideas for Mad Tea Parties on my pinterest board "Wonderland"https://www.pinterest.com/nicoletteblount/wonderland/


Comments
Post a Comment